How to Convert a Screen Point to Real-World Position Using Depth
Niantic Spatial SDK's depth map output allows for dynamically placing objects in an AR scene without the use of planes or a mesh. This guide covers the process of choosing a point on the screen and placing an object in 3D space by using the depth output.

Prerequisites
You will need a Unity project with Niantic Spatial AR enabled. For more information, see Set up the Niantic SDK for Unity.
If this is your first time using depth, Accessing and Displaying Depth Information provides a simpler use case for depth and is easier to start with.
Steps
If the main scene is not AR-ready, set it up:
-
Remove the Main Camera.
-
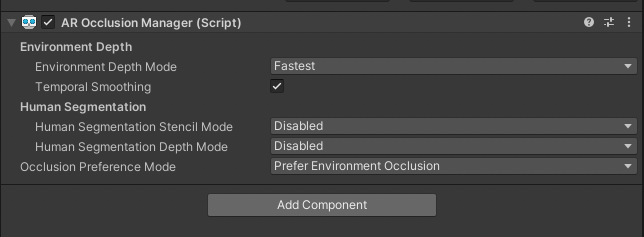
Add an ARSession and XROrigin to the Hierarchy, then add an AR Occlusion Manager Component to XROrigin. If you want higher quality occlusions, see How to Set Up Real-World Occlusion to learn how to use the
NsdkOcclusionExtension.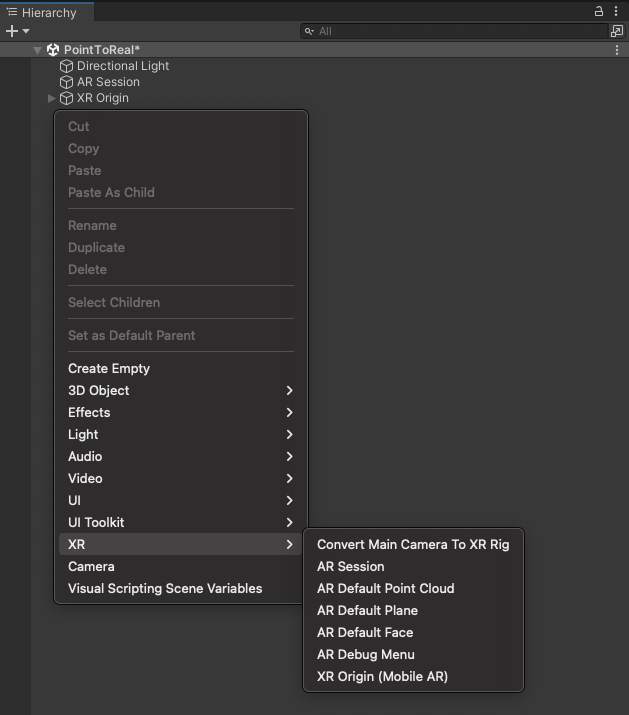
-
Create a
MonoBehaviourscript that will handle depth picking and placing prefabs. Name itDepth_ScreenToWorldPosition. -
Add required namespaces to your script
using NianticSpatial.NSDK.AR.Utilities;
using UnityEngine;
using UnityEngine.InputSystem;
using UnityEngine.XR.ARFoundation;
using UnityEngine.XR.ARSubsystems; -
Collect Depth Images on Update
-
Add a serialized
AROcclusionManagerand a privateXRCpuImagefield.[SerializeField]
private AROcclusionManager _occlusionManager;
private XRCpuImage? _depthImage; -
Create a new method called
UpdateImage:- Check that the
XROcclusionSubsystemis valid and running. - Call
_occlusionManager.TryAcquireEnvironmentDepthCpuImageto retrieve the latest depth image form theAROcclusionManager. - Dispose the old depth image and cache the new value.
private void UpdateImage()
{
    if (!_occlusionManager.subsystem.running)
    {
        return;
    }

    if (_occlusionManager.TryAcquireEnvironmentDepthCpuImage(out var image))
    {
        // Dispose the old image
        _depthImage?.Dispose();

        // Cache the new image
        _depthImage = image;
    }
} - Check that the
-
Invoke the
UpdateImagemethod within theUpdatecallback:private void Update()
{
UpdateImage();
}
-
-
Calculate the display matrix: Because depth images are oriented towards the sensor when surfaced from the Machine Learning model, they need to be sampled with respect to the current screen orientation. The display transform provides a mapping to convert from screen space to the image coordinate system. We use
XRCpuImageinstead of a GPU Texture so that theSample(Vector2 uv, Matrix4x4 transform)method can be used on the CPU.- Add a private
Matrix4x4and aScreenOrientationfield.private Matrix4x4 _displayMatrix;
private ScreenOrientation? _latestScreenOrientation; - Create a new method called
UpdateDisplayMatrix. - Check that the script has a valid
XRCpuImagecached. - Check if the matrix needs to be recalculated by testing whether the screen orientation has changed.
- Call
CalculateDisplayMatrixto calculate a matrix that transforms the screen coordinates to image coordinates.
private void UpdateDisplayMatrix()
{
    // Make sure we have a valid depth image
    if (_depthImage is {valid: true})
    {
        // The display matrix only needs to be recalculated if the screen orientation changes
        if (!_latestScreenOrientation.HasValue ||
            _latestScreenOrientation.Value != Screen.orientation)
        {
            _latestScreenOrientation = Screen.orientation;
            _displayMatrix = CalculateDisplayMatrix(
                _depthImage.Value.width,
                _depthImage.Value.height,
                Screen.width,
                Screen.height,
                _latestScreenOrientation.Value);
        }
    }
}

private static Matrix4x4 CalculateDisplayMatrix(
    int imageWidth, int imageHeight,
    int screenWidth, int screenHeight,
    ScreenOrientation orientation,
    bool invertVertically = false)
{
    bool rotate = orientation == ScreenOrientation.Portrait
               || orientation == ScreenOrientation.PortraitUpsideDown;

    float iw = rotate ? imageHeight : imageWidth;
    float ih = rotate ? imageWidth  : imageHeight;
    float screenAspect = (float)screenWidth / screenHeight;
    float imageAspect  = iw / ih;
    float scale = screenAspect / imageAspect;

    float scaleX = scale < 1f ? 1f : 1f / scale;
    float scaleY = scale < 1f ? -scale : -1f;

    if (invertVertically)
        scaleX = -scaleX;

    float angle = orientation switch
    {
        ScreenOrientation.Portrait           =>  90f,
        ScreenOrientation.PortraitUpsideDown => -90f,
        ScreenOrientation.LandscapeRight     => 180f,
        _                                    =>   0f,
    };

    return Matrix4x4.Translate(new Vector3(0.5f, 0.5f, 0f))
         * Matrix4x4.Scale(new Vector3(scaleX, scaleY, 1f))
         * Matrix4x4.Rotate(Quaternion.Euler(0f, 0f, angle))
         * Matrix4x4.Translate(new Vector3(-0.5f, -0.5f, 0f));
}- Invoke the
UpdateDisplayMatrixmethod within theUpdatecallback:
private void Update()
{
    ...
    UpdateDisplayMatrix();
} - Add a private
-
Set up code to Handle Touch Inputs:
- Create a private Method named "HandleTouch".
- In editor, we'll use
Mouse.current.leftButton.wasPressedThisFrameto detect mouse clicks. - On device, we'll use
Touchscreen.current.primaryTouch.press.wasPressedThisFrameto detect taps. - Then, get the 2D screenPosition Coordinates from the device.
private void HandleTouch()
{
    // In the editor we want to use mouse clicks, on phones we want touches.
#if UNITY_EDITOR
    if (Mouse.current != null && Mouse.current.leftButton.wasPressedThisFrame)
    {
        var screenPosition = Mouse.current.position.ReadValue();
#else
    var touchscreen = Touchscreen.current;
    if (touchscreen == null || !touchscreen.primaryTouch.press.wasPressedThisFrame)
        return;
    {
        var screenPosition = touchscreen.primaryTouch.position.ReadValue();
#endif
        // do something with touches
    }
} -
Convert touch points from the screen to 3D Coordinates using Depth
-
In the HandleTouch method, check for a valid depth image when a touch is detected.
    // do something with touches
    if (_depthImage.HasValue)
    {
        // 1. Sample eye depth

        // 2. Get world position

        // 3. Spawn a thing on the depth map
} -
Sample the depth image at the screenPosition to get the z-value
// 1. Sample eye depth
var uv = new Vector2(screenPosition.x / Screen.width, screenPosition.y / Screen.height);
var eyeDepth = _depthImage.Value.Sample<float>(uv, _displayMatrix); -
Add a
Camerafield to the top of script:[SerializeField]
private Camera _camera; -
This will use Unity's
Camera.ScreenToWorldPointfunction. Call the method in "HandleTouch" to convert screenPosition and eyeDepth to worldPositions.// 2. Get world position
var worldPosition =
_camera.ScreenToWorldPoint(new Vector3(screenPosition.x, screenPosition.y, eyeDepth)); -
Spawn a GameObject at this location in world space:
-
Add a
GameObjectfield to the top of the script:[SerializeField]
private GameObject _prefabToSpawn; -
Instantiate a copy of this prefab at this position:
// 3. Spawn a thing on the depth map
Instantiate(_prefabToSpawn, worldPosition, Quaternion.identity);
-
-
Add
HandleTouchto the end of theUpdatemethod.private void HandleTouch()
{
// In the editor we want to use mouse clicks, on phones we want touches.
#if UNITY_EDITOR
if (Mouse.current != null && Mouse.current.leftButton.wasPressedThisFrame)
{
var screenPosition = Mouse.current.position.ReadValue();
#else
var touchscreen = Touchscreen.current;
if (touchscreen == null || !touchscreen.primaryTouch.press.wasPressedThisFrame)
return;
{
var screenPosition = touchscreen.primaryTouch.position.ReadValue();
#endif
if (_depthImage is {valid: true})
{
// Sample eye depth
var uv = new Vector2(screenPosition.x / Screen.width, screenPosition.y / Screen.height);
var eyeDepth = _depthImage.Value.Sample<float>(uv, _displayMatrix);
// Get world position
var worldPosition =
_camera.ScreenToWorldPoint(new Vector3(screenPosition.x, screenPosition.y, eyeDepth));
// Spawn a thing on the depth map
Instantiate(_prefabToSpawn, worldPosition, Quaternion.identity);
}
}
} -
Add the
Depth_ScreenToWorldPositionscript as a Component of theXROriginin the Hierarchy:- In the Hierarchy window, select the
XROrigin, then click Add Component in the Inspector. - Search for the
Depth_ScreenToWorldPositionscript, then select it.
- In the Hierarchy window, select the
-
Create a Cube to use as the object that will spawn into the scene:
- In the Hierarchy, right-click, then, in the Create menu, mouse over 3D Object and select Cube.
- In the Inspector, scale the Cube object down from (1, 1, 1) to (0.75, 0.75, 0.75).
- Drag the new Cube object from the Hierarchy to the Assets window to create a prefab of it, then delete it from the Hierarchy. (The Cube in the Assets window should remain.)
-
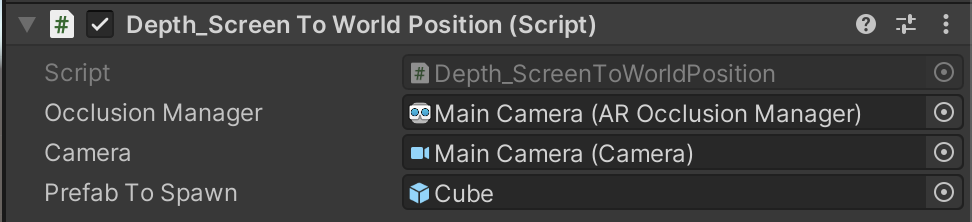
Assign the fields in the
Depth_ScreenToWorldPositionscript:- In the Hierarchy window, select the
XROrigin, then expand theDepth_ScreenToWorldPositionComponent in the Inspector window. - Assign the
XROriginto the AROcclusionManager field. - Assign the Main Camera to the Camera field.
- Assign your new Cube prefab to the Prefab to Spawn field.
- In the Hierarchy window, select the
-
Try running the scene in-editor using Playback or open Build Settings, then click Build and Run to build to device.

-
If something did not work, double check the steps above and compare your script to the one below.
Click to show the Depth_ScreenToWorldPosition script
using NianticSpatial.NSDK.AR.Utilities;
using UnityEngine;
using UnityEngine.InputSystem;
using UnityEngine.XR.ARFoundation;
using UnityEngine.XR.ARSubsystems;
public class Depth_ScreenToWorldPosition : MonoBehaviour
{
[SerializeField]
private AROcclusionManager _occlusionManager;
[SerializeField]
private Camera _camera;
[SerializeField]
private GameObject _prefabToSpawn;
private Matrix4x4 _displayMatrix;
private XRCpuImage? _depthImage;
private ScreenOrientation? _latestScreenOrientation;
private void Update()
{
UpdateImage();
UpdateDisplayMatrix();
HandleTouch();
}
private void OnDestroy()
{
_depthImage?.Dispose();
}
private void UpdateImage()
{
if (!_occlusionManager.subsystem.running)
return;
if (_occlusionManager.TryAcquireEnvironmentDepthCpuImage(out var image))
{
_depthImage?.Dispose();
_depthImage = image;
}
}
private void UpdateDisplayMatrix()
{
if (_depthImage is {valid: true})
{
if (!_latestScreenOrientation.HasValue ||
_latestScreenOrientation.Value != Screen.orientation)
{
_latestScreenOrientation = Screen.orientation;
_displayMatrix = CalculateDisplayMatrix(
_depthImage.Value.width,
_depthImage.Value.height,
Screen.width,
Screen.height,
_latestScreenOrientation.Value);
}
}
}
private void HandleTouch()
{
#if UNITY_EDITOR
if (Mouse.current != null && Mouse.current.leftButton.wasPressedThisFrame)
{
var screenPosition = Mouse.current.position.ReadValue();
#else
var touchscreen = Touchscreen.current;
if (touchscreen == null || !touchscreen.primaryTouch.press.wasPressedThisFrame)
return;
{
var screenPosition = touchscreen.primaryTouch.position.ReadValue();
#endif
if (_depthImage is {valid: true})
{
var uv = new Vector2(screenPosition.x / Screen.width, screenPosition.y / Screen.height);
var eyeDepth = _depthImage.Value.Sample<float>(uv, _displayMatrix);
var worldPosition =
_camera.ScreenToWorldPoint(new Vector3(screenPosition.x, screenPosition.y, eyeDepth));
Instantiate(_prefabToSpawn, worldPosition, Quaternion.identity);
}
}
}
private static Matrix4x4 CalculateDisplayMatrix(
int imageWidth, int imageHeight,
int screenWidth, int screenHeight,
ScreenOrientation orientation,
bool invertVertically = false)
{
bool rotate = orientation == ScreenOrientation.Portrait
|| orientation == ScreenOrientation.PortraitUpsideDown;
float iw = rotate ? imageHeight : imageWidth;
float ih = rotate ? imageWidth : imageHeight;
float screenAspect = (float)screenWidth / screenHeight;
float imageAspect = iw / ih;
float scale = screenAspect / imageAspect;
float scaleX = scale < 1f ? 1f : 1f / scale;
float scaleY = scale < 1f ? -scale : -1f;
if (invertVertically)
scaleX = -scaleX;
float angle = orientation switch
{
ScreenOrientation.Portrait => 90f,
ScreenOrientation.PortraitUpsideDown => -90f,
ScreenOrientation.LandscapeRight => 180f,
_ => 0f,
};
return Matrix4x4.Translate(new Vector3(0.5f, 0.5f, 0f))
* Matrix4x4.Scale(new Vector3(scaleX, scaleY, 1f))
* Matrix4x4.Rotate(Quaternion.Euler(0f, 0f, angle))
* Matrix4x4.Translate(new Vector3(-0.5f, -0.5f, 0f));
}
}