Set up the Niantic SDK for Unity
The Niantic Spatial SDK (NSDK) for Unity extends AR Foundation with Niantic Spatial features for VPS localization, depth, occlusion, meshing, semantics, and developer tools such as playback and project validation, so you can build Unity AR experiences with real-world localization, contextual awareness, and NSDK development workflows.
Prerequisites
Before you begin, decide whether you are building for Android, iOS, or Meta Quest 3. If you are building for iOS, you will also need Apple Developer account setup for signing.
AI set up
Niantic Spatial provides a Unity Setup Skill containing the NSDK setup workflow. AI assistants can use the Skill to guide or automate NSDK installation and configuration, helping you complete the steps on this page more quickly.
To use an AI coding assistant to set up the Niantic SDK for you, do the following:
- Download the Unity setup Skill.
- Extract and place the folder into your AI assistant's skills directory. For example:
- Claude Code:
.claude/skills/ - Codex:
.agents/skills/
- Claude Code:
- Create or open an existing Unity project. If you're creating a new project, use the 3D (Built-In Render Pipeline) or Universal 3D (Core) template.
- Ask your AI assistant to set up NSDK in your project. It will guide you through the required steps and help configure your project.
Manual set up
To manually set up the Niantic SDK for Unity, you will need to:
- Create an account.
- Download and install the Unity Hub and the Unity Engine.
- Install the Niantic SDK Unity packages.
- Authenticate Niantic SDK in Unity.
- Activate the XR Loader for your mobile platform.
- Configure the build platform in Unity for your target device.
- Set up a basic AR scene to test your configuration.
Steps to manually set up the NSDK are shown in the following sections.
Create an account
Before getting started with the NSDK setup, follow the steps to create a Scaniverse account. You will use this account either to sign in through NSDK > Settings in the Unity Editor or to create a developer token, depending on the authorization path you choose.
For authorization options, see Authorization.
Download and install Unity
In order to install the Unity 3D Engine you must first install the Unity Hub which gives you access to the latest versions of the currently supported engines.
NSDK only supports Unity LTS and Unity 6000.0.74f1. If you no longer see this engine version in the Unity Hub downloads window, go to the Unity download archive to locate it. Using any other version of 6000.0.x can introduce conflicts with NSDK and is not recommended.
Install the Niantic SDK Packages
Use the following platform-specific instructions to create your Unity project and add the NSDK packages through Unity Package Manager. Select the tab for your target platform before you begin.
- Android
- iOS
- Meta Quest 3
- Create a new Unity project with the 3D (Built-In Render Pipeline) template. Alternatively, if planning to use Unity's Universal Render Pipeline select the Universal 3D (Core) template.
If you are using or plan to use the Universal Render Pipeline (URP), refer to How to Set Up NRDK with the Universal Render Pipeline for additional setup instructions.
- In your Unity project, open the Window top menu, then select Package Manager.
If you are using Unity 6000.0.X, you must update the AR Foundation package to a minimum of 6.3.0, but we recommend 6.4.1.
- From the plus menu on the Package Manager tab, select Add package from git URL....
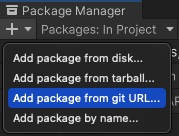
- Enter
https://github.com/nianticspatial/nsdk-library-upm.git.- If prompted, select Yes to activate the new Input System Package. This may require a restart of the Unity Editor.
To install a specific NSDK version, use Add package from git URL... and append the Git tag, branch, or commit after a #. For example: https://github.com/nianticspatial/nsdk-library-upm.git#vX.Y.Z.
The official installation path is Add package from git URL.... If you want to install NSDK locally instead:
- Download and unzip the Source code (zip) from the Unity package release repository.
- In Unity, open Window > Package Management > Package Manager.
- Open the drop-down menu next to the + in the top-left main window.
- Select Install Package From Disk in Unity Package Manager
- Select the root
package.jsonfile.
Do not use GitHub source archives from Download ZIP / tar.gz or Add package from tarball for this workflow.
- Create a new Unity project with the 3D (Built-In Render Pipeline) template. Alternatively, if planning to use Unity's Universal Render Pipeline select the Universal 3D (Core) template.
If you are using or plan to use the Universal Render Pipeline (URP), refer to How to Set Up NRDK with the Universal Render Pipeline for additional setup instructions.
- In your Unity project, open the Window top menu, then select Package Manager.
If you are using Unity 6000.0.X, you must update the AR Foundation package to a minimum of 6.3.0, but we recommend 6.4.1.
- From the plus menu on the Package Manager tab, select Add package from git URL....
- Enter
https://github.com/nianticspatial/nsdk-library-upm.git.- If prompted, select Yes to activate the new Input System Package. This may require a restart of the Unity Editor.
To install a specific NSDK version, use Add package from git URL... and append the Git tag, branch, or commit after a #. For example: https://github.com/nianticspatial/nsdk-library-upm.git#vX.Y.Z.
The official installation path is Add package from git URL.... If you want to install NSDK locally instead:
- Download and unzip the Source code (zip) from the Unity package release repository.
- In Unity, open Window > Package Management > Package Manager.
- Open the drop-down menu next to the + in the top-left main window.
- Select Install Package From Disk in Unity Package Manager
- Select the root
package.jsonfile.
Do not use GitHub source archives from Download ZIP / tar.gz or Add package from tarball for this workflow.
The Niantic SDK leverages Meta XR Core SDK and Unity's XR Core Plugin to support the Meta Quest 3.
Follow Meta's official tutorial to begin developing for the Meta Quest 3 in Unity 6.
Notes & Caveats
- Ensure you're using a supported version of Unity 6 (such as 6000.0.74f1) and the OpenXR plugin (
com.unity.xr.openxr) version 1.15.1. Version 1.16.1 is known to cause issues, so force the package to 1.15.1 in the Package Manager. - The Meta XR Core SDK must be acquired from the Unity Asset Store, as explained in the Meta docs. Select Enable Feature Set if prompted.
- If prompted to restart the Unity Editor, do so with Restart Editor.
- Verify the Quest's OS version is >=v74
- Go to Meta → Tools → Project Setup Tools and resolve all issues.
- In your Unity project, open the Window top menu, then select Package Manager.
- From the plus menu on the Package Manager tab, select Add package from git URL....
- Enter
https://github.com/nianticspatial/nsdk-library-upm.git.- If prompted, select Yes to activate the new Input System Package. This may require a restart of the Unity Editor.
- Install the NSDK Quest Package by repeating these steps using the following URL instead:
https://github.com/nianticspatial/nsdk-library-upm-quest3.git.
To install a specific NSDK version, use Add package from git URL... and append the same Git tag, branch, or commit to both package URLs. For example:
https://github.com/nianticspatial/nsdk-library-upm.git#vX.Y.Zhttps://github.com/nianticspatial/nsdk-library-upm-quest3.git#vX.Y.Z
Authenticate Niantic SDK in Unity
Authenticate NSDK in Unity before you build and run your project. You can do this in one of two ways:
-
Sign in through the Unity Editor:
- In Unity's top menu bar, select NSDK.
- Select Settings.
- Sign in to your Scaniverse account.
-
Provide an access token directly to NSDK: For development and internal testing, create a developer token in Scaniverse Web. For production apps, use an access token from your backend.
Then choose one of the following ways to provide that token to NSDK:
- In Project Settings, paste it into Edit > Project Settings > XR Plug-in Management > Niantic Spatial Development Kit > Credentials > Niantic Spatial Access Token.
- In code, set
NsdkSettingsHelper.ActiveSettings.AccessToken.
For more information, see Authorization, Generate developer tokens, and Generate access tokens.
Before you continue, confirm that one of these authentication paths is set up. Importing NSDK adds an AuthBuildSettings asset, and that asset can be empty, so a successful build does not confirm that authentication is configured.
Activate the XR loader
In Unity versions 6000.0.74f1 or newer, you might see a benign error in the console after following these steps.
- Android
- iOS
- Open the NSDK top menu, then select XR Plug-in Management.
- In the XR Plug-in Management menu, select the Android tab, then check the box labeled Niantic Spatial Development Kit + Google ARCore.
- Open the NSDK top menu, then select XR Plug-in Management.
- In the XR Plug-in Management menu, select the iOS tab, then check the box labeled Niantic Spatial Development Kit + Apple ARKit.
Configure the build platform
- Open the Build Profiles window by selecting File > Build Profiles.
- Select iOS or Android, then click Switch Platform. After the progress bar finishes, click Player Settings. Select your platform from the tabs, scroll down to Other Settings, and change the following settings:
- Android
- iOS
- Rendering - Uncheck Auto Graphics API. If Vulkan appears in the Graphics API list, remove it.
- Identification - Set the Minimum API Level to Android 7.0 'Nougat' (API Level 24) or higher.
- Configuration - Set the Scripting Backend to IL2CPP, then enable both ARMv7 and ARM64.
- Identification > Signing Team ID - Enter your iOS app developer key from developer.apple.com.
- Camera Use Description - Write a description for how you're using AR, such as "NSDK".
- Target Minimum iOS Version - Set to 14.0 or higher.
- Architecture - Select ARM64.
In Unity, NSDK is configured through components and project settings. Once enabled, the SDK automatically receives AR frame and sensor data and updates each frame at runtime.
Set up a basic AR scene
- Android
- iOS
To get started creating your own AR project, begin by creating an empty AR scene:
- Create a new Basic scene:
- From the main menu, choose File > New Scene.
- Select Basic (Built-in) and click Create.
- Right-click on the Main Camera and select Delete.
- Add an ARSession and XROrigin to your new scene
- Select the new scene in the Hierarchy.
- From the main menu, select Game Object > XR > AR Session.
- Repeat to add an XR Origin (Mobile AR).
- Save the scene using File > Save.
If you choose Save As Scene Template, you can select this scene in the New Scene dialog next time.
Next steps
After your project is set up, continue to Unity sample projects to explore working examples of NSDK features.