Scan with a 360 camera
This guide covers best practices for capturing, uploading, and processing 360 camera scans to generate Gaussian splats in Scaniverse.
Quick workflow
A typical 360 camera workflow includes:
- Choose a camera and format from Supported cameras and formats.
- Capture a scan by walking the perimeter, then filling the interior with overlapping passes.
- Transfer your file to a desktop computer using an SD card, USB cable, or other supported method.
- Upload your scan to Scaniverse Web.
- Process and download the resulting splat.
Overview
A 360 camera captures the entire environment at once using two lenses that each record slightly more than 180°. The camera stitches these feeds together so you can view the full surroundings in every direction simultaneously as shown in the following video:
A 360 camera is:
- Efficient: Capturing an environment with a 360 camera is roughly three times faster than using a mobile phone.
- Immersive: The camera captures the entire environment—floor to ceiling—at once, producing splats that feel complete and immersive.
- Easy to use: The camera sees in all directions simultaneously, which significantly reduces the chance of leaving holes or blind spots in your scan.
- Ideal for large areas: The combination of speed and full-environment capture makes 360 cameras especially well suited for digitizing large spaces such as marinas, parks, and large indoor facilities.
- Limited in duration: The basic tier supports up to 5-minute videos; higher tiers support up to 10-minute videos.
Requirements
- A supported 360 camera
- A desktop computer for uploading your scan
- A Scaniverse account
Supported cameras and formats
Scaniverse supports two input formats depending on your camera:
- Raw
.insvfiles from Insta360 X5 and X4 (no conversion required) - Stitched
.mp4files from all other 360 cameras
Insta360 X5 (recommended) and X4 - Native .insv support
Scaniverse Web natively supports raw .insv files from the Insta360 X5 and X4. Upload the file directly from your camera's SD card—no stitching or conversion required. The Insta360 X5 is the recommended camera for the best overall quality and reliability.
All other 360 cameras - Supported via .mp4 workflow
All other cameras require a stitched, equirectangular .mp4 file. Results vary depending on the camera's resolution, stitching software quality, and gyroscope metadata accuracy.
Commonly used cameras in this category include:
- Insta360 X3, One RS 1-inch 360
- Ricoh Theta X and Ricoh Theta Z1
- GoPro Max 2
- DJI Osmo 360
- 360 drones such as Antigravity A1 and DJI Avata 360
Capture scan
This section explains how to capture a scan using a 360 camera. Focus on stable movement, complete coverage, and consistent camera setup.
Shooting overview
Walk smoothly, start with a perimeter loop, fill the area with a grid pattern, and close your loop at the end. Keep subjects at least 30 cm away.
Camera and equipment setup
Configure your camera before capturing. The following settings are based on the Insta360 X5 but also apply generally to other 360 cameras.
Camera settings
- Resolution: 8K
- Framerate: 30 fps
- Adaptive tone: Off
- Video encoding: H.265
- Color: Standard
- Sharpness: Low
Exposure
-
Indoor: Set shutter speed to 1/500 and ISO to Auto to reduce motion blur.
The following video shows how to open exposure settings and set 1/500: -
Outdoor: Set both shutter speed and ISO to Auto.
The following video shows how to use Auto mode:
Equipment setup
-
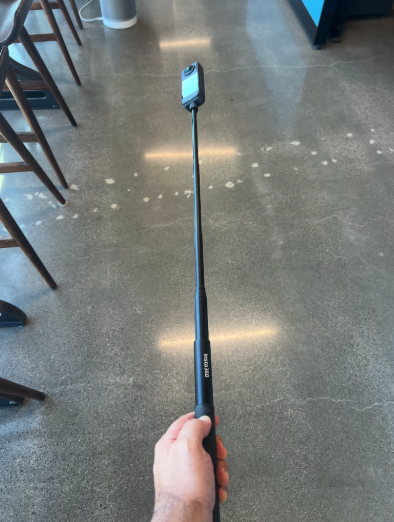
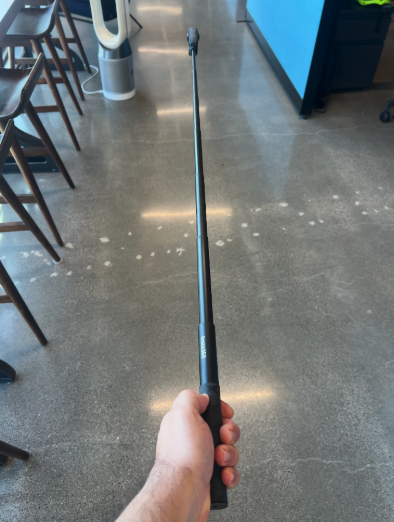
Use an invisible selfie stick
-
Extend the selfie stick to control camera distance to maintain consistent coverage while minimizing your presence in the scan as follows:
- Indoor spaces: Extend to roughly 2/3 of its full length.
- Outdoor spaces: Extend to full length.
-
Keep the camera upright and perpendicular to the ground
The following image shows the recommended selfie stick positions: extended to two-thirds length for indoor capture (left) and fully extended for outdoor capture (right).
Capture technique
Capture quality depends on consistent movement and complete coverage.
Movement
- Walk at a slow and steady pace.
- Avoid jerks, bouncing, or rapid turns.
Distance
- Stay about 1 meter from key surfaces.
- Do not get closer than 30 cm.
- Avoid placing objects across the stitch line between the two lenses which can cause warping, blind spots. or artifacts in the final splat.
Coverage
- Start with a perimeter loop pattern.
- Fill the interior using a lattice grid pattern.
- End near your starting point to close the loop.
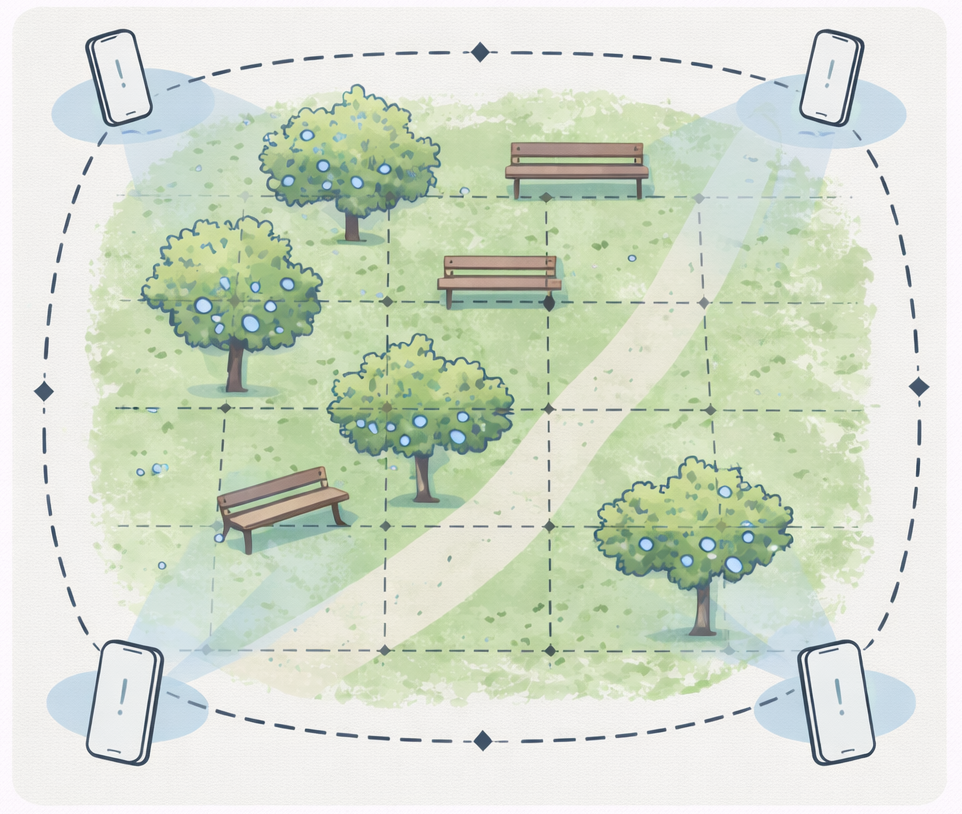
Figure: Dotted lines illustrate scanning paths along the perimeter of a large area, with interior coverage captured using a lattice grid.
Calibration and environment
Environmental conditions and optional calibration affect scan quality.
Environment
- Use well-lit, evenly lit spaces.
- Avoid strong shadows or direct sunlight.
- Capture when the area is empty.
Metric scale calibration
To enable real-world scale:
- Download the calibration board US Letter | A4 and print at 100% scale.
- Place the board flat on the floor.
- At the start of the scan, circle the camera around the board so it is clearly visible.
- Continue scanning the environment as usual.
Scaniverse automatically detects the calibration board and applies 1:1 scaling during processing.
Upload and process scans
After capturing a scan, transfer your files to a desktop computer and upload them to Scaniverse Web for processing. This section covers how to prepare your files, upload them, and process and download the resulting splat.
Prepare files
Before uploading, transfer your 360 capture files to a desktop computer. Scaniverse processes 360 data through Scaniverse Web, so all uploads and processing must be done in a desktop browser.
360 processing runs exclusively through Scaniverse Web on a desktop browser, not the mobile app.
If you are using an Insta360 X5 or X4, you can upload raw .insv files directly without additional preparation. For all other cameras, you must first convert your footage into a stitched .mp4 file.
Pre-processing
To prepare stitched footage for upload:
- Trim: Remove unnecessary portions of the video to reduce file size and processing time.
- Enable direction lock: When exporting to
.mp4, enable direction lock to preserve spatial consistency and gyroscope orientation. - Export: Export the stitched file as an
.mp4using H.264 or H.265 encoding. Use the manufacturer's official desktop software for best results.
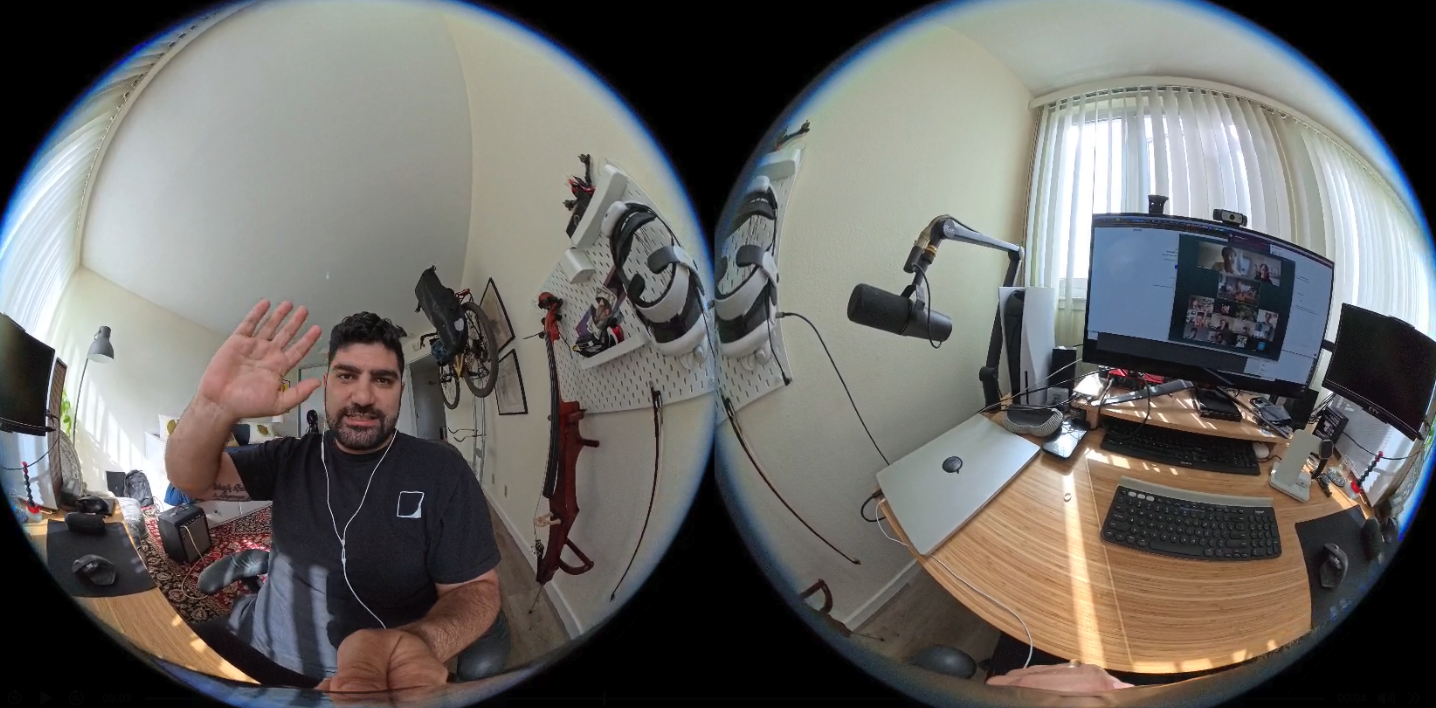
The following image shows a raw 360 camera image prior to stitching. Each frame combines input from two 180+ degree cameras inside the device.
Upload scan
After preparing your file, upload it to Scaniverse Web to begin processing. You can generate one asset for every 360 camera scan.
- Log in to your Scaniverse Web account using a desktop browser.
- Upload your scan file:
- Insta360 X5/X4: Upload the raw
.insvfile directly from your local drive or SD card. - Other cameras: Upload the stitched
.mp4file exported from your camera’s desktop software.
- Insta360 X5/X4: Upload the raw
- Start the upload to begin cloud processing.
Processing begins automatically after the upload completes.
Process and download
After your upload completes, generate assets as follows:
- Select the Site that contains the scan you want to process.
- Select Generate assets.
- In the pop-up window, enter an Asset name.
- Choose Gaussian splat.
- Choose Select scans.
- Select the checkbox next to the scan you want to process.
- Select Generate.
Scaniverse extracts frames from your video and reconstructs the scene. Processing time depends on file size and complexity.
Video length limits
- Free plan: 360 camera splat generation is not available.
- Plus plan: uploads are limited to videos up to 5 minutes.
- Pro plan: uploads are limited to videos up to 10 minutes.
View splat
Once processing is complete, you can view the splat directly in Scaniverse Web.
Download splats
Download the generated splat in the following format:
- SPZ: A compressed format for fast loading, sharing, and efficient storage
- PLY: (Coming soon) A standard, uncompressed 3D format ideal for editing or importing into professional 3D software including Unity, Unreal, or Blender.
Troubleshooting and FAQ
This section covers common issues and frequently asked questions when capturing and processing 360 scans.
Blurry splats
Use a shutter speed of 1/500 for indoor environments to reduce motion blur.
Drifting or warped environments
If you used the .mp4 workflow, verify that direction lock was enabled during export.
Handling large files
If your capture exceeds your account tier’s video length limit, trim the footage into smaller segments using your camera’s desktop software before uploading.
Can I upload 360 videos via the mobile app?
No. Uploading and processing 360 video files is only supported via Scaniverse Web on a desktop browser.
Can I use a metric scale calibration board?
Yes. Print the calibration board US Letter | A4 and circle it with your camera at the start of your recording. Scaniverse automatically scales the resulting splat to real-world 1:1 metric measurements.
Can I use a 360 drone?
Yes, you can use 360 videos from 360 drones such as the Antigravity A1 and DJI Avata 360.
Do I need desktop software to process my files?
- No, if you have an Insta360 X5 or X4. Scaniverse Web natively supports raw
.insvfiles from these models. No additional software is required. - Yes, if you use any other camera. Use the manufacturer’s desktop software to stitch your footage into an
.mp4with direction lock enabled before uploading to Scaniverse Web.